Before you begin You need a Phillips head screwdriver.
Remove all CDs and DVDs from the optical drive.
Turn off the computer, and disconnect all cables.
Transfer the computer to a clear, flat, stable work surface over a non-carpeted floor.
Place the computer face-down on a soft flat surface.
WARNING:Make sure the computer is disconnected from power before starting.
let's start.
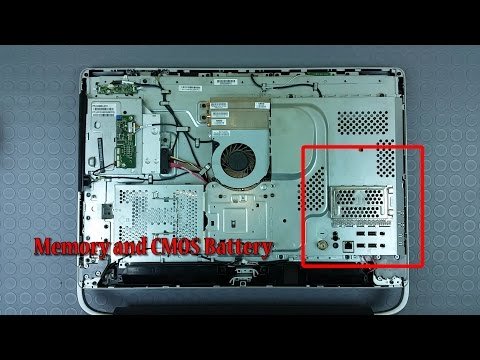
Remove the VESA cover Loosen each of the three captive Phillips head screws Remove the rear cover to access the internal components CD/DVD Drive – HP touchsmart 520 Hard Drive – HP touchsmart 520 System FAN – HP touchsmart 520 Memory and CMOS Battery – HP touchsmart 520 Swing up and remove the EMI shield covering the memory slots Memory4 GB PC3-12800S To insert a memory module,angle the module to about 45 degrees and engage the notch on the module with the tab in the socket Press the memory module down into place until the retaining levers snap into position over the sides of the module To remove the battery, simultaneously press the tab to release the battery and lift it out CMOS BatteryCR2032 3 Volt To replace the battery, simultaneously press the tab and insert the battery in the same orientation with the writing facing the same way as it was on the battery that was removed.
Replace the shield that covers the memory Align the rear cover onto the back of the computer.
Making sure the cover is correctly placed over the side I/O ports.
Press down firmly until the cover snaps into place.
The bottom edge will not be flush against the front bezel Replace the three screws on the rear cover Replace the VESA cover how to replace memory on hp touchsmart 520.
